Restoring Reverie

: The Art of Restoring & Sailing a Classic Wooden Sailboat


Leave a comment

Prudence

DSCN5555

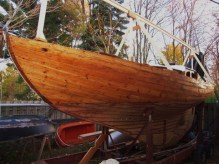
I would like to introduce you to  Prudence, our little Compac 16.  Prudence is the result of my innocent perusal of Craigslist last October.  I like to look at boats and this little beauty caught my eye as I scrolled down the gallery of photos .  The ad was 24 days old when I saw it but it was mid-October, not a time when most people get boat fever.  Mine runs 365 days a year so I took the chance and shot an email to the seller.  I simply said, “Is this boat still available?”  I got and equally simple reply, “Yes, it is.”
I talked it over with Julia and she agreed that it was a nice looking boat and it would be great to have something to trailer around.  Once it was paid for, it would be relatively cheap to own.  We discussed all the places we could tuck into with a little keel boat that only draws 18 inches.  It really would open up a lot of Great Lakes destinations previously off limits for Persistence which draws 4-1/2 feet.  It sleeps 2, has an ample cockpit and, as our friend Terrence put it, “She looks shippy”.  Her graceful cruiser bow hearkens back to many classic designs and somewhat resembles Reverie’s spoon bow.  Prudence looked good and had a reasonable asking price so, I was off for the first look at her.
 It was a blustery October day when I first drove out and met Jack.  The first thing I noticed when I pulled into his driveway was the several campers (one being an old Airstream) and the plethora of boats sitting here and there.  I liked this guy before I even met him.  He turned out to be an older guy in his late 60’s or early 70’s.  I’m not good with ages as we all show our years differently.  We talked boats, campers, life in general and then, he showed me the boat.  She was dirty and had not been in the water for several years.  I gave her a quick look over and asked Jack if he minded if I paid him off bit by bit over the Winter.  He said, “Aw, I don’t need the money.  Sure”  I think he knew just how much I wanted this little boat.
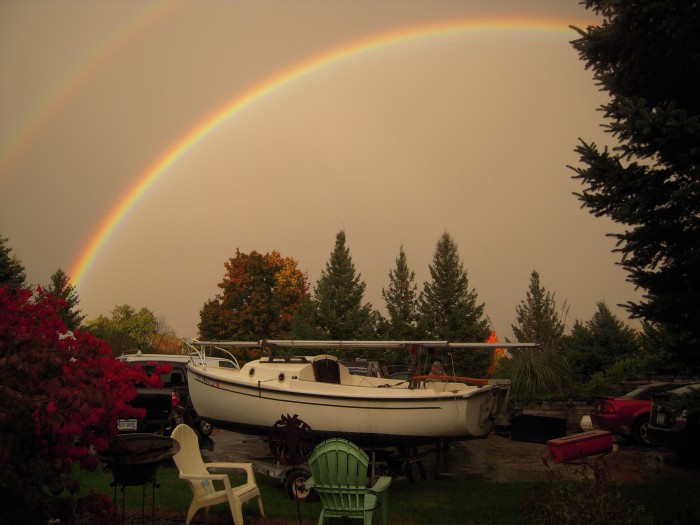
The next step was to report back to Julia with my findings and arrange for the both of us to go out and have a look.  A few days later, the Great Lakes weather had changed and we had a warm up accompanied by a serious thunderstorm system pushing yet another cold front through.  This all occurred on our way out to look at the boat.  When we arrived, there was  a magnificent double rainbow framing Prudence!  Jack was there with his wife and we all laughed about it being a sign that we were to get the boat.  Maybe so.  We shook hands and that was that.
DSCN5554
I’m not a fan of many pocket cruiser designs.  There are ones with grotesque cabins that look like they fell from a waterspout. Some have little or no working room to sail.  Others have garish tumblehome or way too much sheer for my liking.  Many have insufficient construction making them little more than day sailors with bunks. Then, there are those that possess all of these undesirable characteristics.  I’ve found the old saying to be true that, “a boat sails like she looks”. There’s no way I would go for some  little mess no matter how good a deal it was.  Yes, there are a lot of ugly babies out there and parents who think their children are geniuses so please bear with me, gentle reader, and know that Prudence is above criticism.
She wasn’t named Prudence when we looked at her.  She had no name at all.  This could not stand as we were to be heading off to new adventures aboard this vessel. I don’t have names for other things in my life except for my old Coleman stove, Trusty and it’s triple burner, Trey (sometimes referred to as Trip).   This little Compac-16  needed a name and Prudence seemed to fit.  Prudence is a key element of a mariner’s skills and our Prudence is a key element of this stage in our lives.
Merriam-Webster’s definition of Prudence:
1:  the ability to govern and discipline oneself by the use of reason
2:  sagacity or shrewdness in the management of affairs
 3:  skill and good judgment in the use of resources
 4:  caution or circumspection as to danger or risk
While it works well for me on the water, I do need to be reminded, from time to time, that prudence is a valuable asset in every day life as well.
Winter held a lot of twists and turns and, somehow, we wound up with a 31 foot wooden sloop named Reverie and the little Compac 16 sat at Jack’s awaiting our return.  It wasn’t until a few weeks ago that I was able to return with more cash.  We sat and talked for over an hour and I left with the little Johnson 4.5 horse motor she came with so as to have it up and running by the time we pick her up in the next few weeks.  While we still have our hands full with the restoration of Reverie, we now have a little boat to get out on Lake Michigan and wherever else we choose to go.  It takes the edge off of the restoration work by reminding us both what it’s all about.


Leave a comment

Off With the Deck?!

IMG_2530

Reverie’s beautiful lines are evident even with her hull looking this way.


Boat repair and restoration requires both optimism (This can be done.) and realism (This is a mess.).  Lately, it’s been a healthy dose of realism.  A lot of the early work on Reverie has been assessing the situation of the leaking deck by finding the damage and what caused it. Rainwater from deck leaks is the culprit, of course, and the damage is insidious at best.  This water coming down from the sky contains a rich collection of fungi and molds ready to set up shop on any food source.  A wooden boat left out in the elements, uncovered for several years, with a leaking deck is a great place for these tiny creatures to do their business.

We got a tarp over Reverie last December, the first day we saw her.  I knew that was the only way to slow down the rot that was beginning to consume her.  Rot needs moisture and the first step was to get that out of the equation.  The next step was to find the entry points where the green water was coming through and stop it.  That was pretty easy as there’s rot in all of the places where the rain water was leaking below.  As I was poking around in the tight confines of the forepeak, (Reverie was designed for sailing and not so much for below decks comfort), I found mushrooms had been growing in the corner joint of the fore hatch carline. They were dried and no longer actively growing but they were there.  I’m sure spores are everywhere!

The next work session involves the complete removal of the fore hatch and immediate treatment with sodium tetraborate (good ol’ borax).  We’re using borax to initially treat any spots that have begun to rot.  It has excellent anti-fungal properties and is safe to use.  It’s major downfall in marine use is that it’s water soluble and will leach out of wood that comes in contact with water.  The immediate goal is to kill what rot is  in the wood already and worry about long term treatment as the restoration progresses.

The real damage from all of this leaking water has been to the deck beams and it is obvious many of them need to be replaced.  Getting at the deck beams is the reason for removing the covering board (the strip of teak that provides an edge for the decking and runs the full length of the hull).  To get to the deck beam end requires removal of the jib tracks to get to the toe rail to get to the covering board. This all reminds me of the children’s song, I Know An Old Lady Who Swallowed A Fly. I just hope it doesn’t get to the point where I swallow the horse!


IMG_2520

A big section of toe rail comes off!

IMG_2510

Stanchion bases half screwed into the sheer clamp, half through covering board. I would like to see them 100% through bolted.


So, our work is exemplified in a children’s song.  So be it.  The initial tack was to get the covering board off which would provide access to the outer ends of the deck beams.  While the toe rail was fastened to the covering board with 4 inch long bronze screws, the covering board is fastened to the sheer clamp and beam ends with steel screws.  These screws are proving to be formidable opponents to extraction and it looks like they have a date with a date with a sawzall and metal cutting blade.  We’ll remove all screws that will come out willingly but the others will have to be cut.

One of the three king beams needs to be replaced.  The king beams provide support for the the mast amidship and can only be extracted by removing the top hull plank known as the sheer plank or sheer strake; unless the entire deck is removed.  Examining the sheer planks, as we worked on the toe rail removal, I began to seriously wish the sheer planks could stay right where they are.  Both port and starboard sides are in fine condition and removing them would mean ‘fixing something that ain’t broke’.  I began to seriously consider removing the deck altogether.

Removing the entire deck might seem extreme but the main issue Reverie faces is this leaking deck. The deck is Douglas Fir and appears in fine condition.  It is attached to the deck beams by a method called “secret nailing”.  Secret nailing is done much the way that wooden floors in houses are laid.  The tongue and groove strips are nailed diagonally through the tongue so the groove covers the nail.  Secret nails go into the beams and then additional nails are driven horizontally through each strip tying the strips together even more. A real advantage of this method is that it leaves a nice, clean deck free of bung holes that are all invitations for water entry.  The major disadvantage is that it is a real pain to repair.  I don’t relish the thought of ripping up this beautiful deck and having to shell out for more lumber.  One of the reasons we took on this project was the condition to the wood.  The only real wood I thought needed replacing was American White Oak, readily available and relatively cheap here in Michigan.  Nice, long, clear lengths of Douglas Fir isn’t going to be cheap.

Remove the sheer planks or remove the deck?   And the winner is: Remove the deck.  Loathing the thought of removing perfectly good planks that are screwed and riveted was what got me considering the deck option and, from there, it began to make more sense.  The damage to the deck beams that can be seen is most likely the tip of the iceberg.  I’m sure there’s plenty more rot in the beams that has yet to rear it’s head.  The mushrooms growing out to joint in the forehatch carline is a real red flag. With the entire deck removed, all of the tops of the beam can be assessed and a fresh coat of red lead primer can be applied.  I’m hoping we can disassemble the secret nailing and reuse the old deck but not banking on it.  Que sera, sera.   Off with the deck!

Cheers,

Roger


Leave a comment

Old School

DSCN0707In a world where people will throw you money without even having a product, there are some businesses that operate another way. I received this hand written note from George Kirby IV, along with a sample color sheet of topside enamels. Does that impress me? Yes it does. The fact that they have been in business for 169 years impresses me.  They must be doing something right.  On top of that, their prices are competitive and their colors have that “vintage” look that will stand out on a vintage boat. We are leaning towards “sand”

DSCN0709


2 Comments

Toe Rail & Covering Board

DSCN0680

“It was one of those March days when the sun shines hot and the wind blows cold: when it is summer in the light, and winter in the shade.” ~ Charles Dickens, Great Expectations


Here we are, watching March, 2015 fade to memory. This year, March came in like a lion and has remained roaring ever since. The Great Lakes region has been sunny and dry, for the most part, but it has been “…summer in the light and winter in the shade.”, as Charles Dickens put it.  I started work yesterday morning in 24° Fahrenheit with a strong North wind gusting 25-30 mph.  The temps stayed steady throughout the day but it was “summer in the light” and there’s work to be done

The Great Lakes began to shed their ice in early March.  The Coast Guard, police and fire rescue crews have had their hands full with idiots on ice ever since. Every year, overzealous ice fishers, snowmobilers unaccustomed to the laws of physics and errant sightseers end up falling through the ice or somehow trapped on a floe drifting off into the open water of the Great Lakes. As more and more people are taking to the water in small craft, there has been a surge in kayak, canoe and paddleboard related incidents as well. This is nothing new, as we can see from previous generations: these people breed.

The work at hand is to get the port-side deck beams in order.  The leaking deck caused them to rot and I’m sure there’s more to discover once things are taken apart.  So, the bronze jib track, the toe rail and the covering board need to come off to get a look the deck beam ends below.  The deck beams are not as accessible as the carlines, which make up the framing for the hatches and cabin.  The deck beams run perpendicular to the keel line of the boat and their outboard ends are worked into the sheer clamp.

The sheer of a boat is the edge where the topsides meet the deck. It is an important aesthetic point in boat design.  The sheer clamp is the board that runs inside, along the topside and provides a band of support for the deck beams.  On larger boats, there is often a board that sits on top of the clamp called a shelf. Reverie only has a clamp that the deck beams are tied into.  The situation gets complicated by the fact that the deck beams are tied into the clamp outboard and not accessible from inside. .

One of the nice things about a wooden boat built in a traditional manner is that, “what’s done, can be undone”. The fact that the boat is held together with fasteners is a plus when doing major work such as replacing the deck beams.   Even though it can be undone, I’m cursing the fact that the deck was allowed to leak and this all occurred. I suppose that is how every old boat, house or any other creation of humanity meets it’s end: human neglect. “An ounce of prevention is worth a pound of cure”.  Yes, it’s times like these when many an old proverb comes to mind.  DSCN0683

The task of removing a multitude of screws is best done with a hand brace fitted with the appropriate screwdriver bit.  I also came armed with a hand impact driver to loosen up any recalcitrant fastenings.  The hand brace exerts an amazing amount of torque and allows you to put downward pressure on the screw.  This is especially important when removing screws that have been in place for over 60 years and are unwilling to yield.

DSCN0684

The bronzed track is held down with stainless steel screws and came off without incident.  I did find splitting in the toe rail at the scarf which was caused by the linear nature of the track and the natural grain of wood.  “Easy, Igor. You impetuous young boy!”

The toe rail is fastened to the covering board with 4" silicon bronze screws.  The phillips heads want to strip out if you even look at them the wrong way.

The toe rail is fastened to the covering board with 4″ silicon bronze screws under wooden bungs. The phillips heads want to strip out if you even look at them the wrong way.

The covering board appears to be fastened with steel flat head screws which have very shallow slots that will require careful cleaning and concentration to remove.  I left that task until I set up a better scaffolding as it will require a lot of downward pressure on the brace and bit.  I’m going to have to make a concerted effort to extract these puppies.

I made it four hours before calling it a day. The wind really took it out of me.  The day was a success in that, I was able to ascertain how easy or difficult this stage would be.  I’m expecting the rest of the port-side toe rail and covering board removal is going to take another 8 to 10 hours.  And that’s if everything goes well!

11:00 a.m.

11:00 a.m.

3:00 p.m.

3:00 p.m.

Think Spring, my friends!

~Roger


Leave a comment

Galley Drawers

DSCN0608

Dimensions for the galley drawers.


Happy Pi Day to all!  As the month of March approaches mid-point, we are seeing some real signs of Spring here in Michigan   We’ve had agreeable, sunny days with temperatures in the balmy 40° Fahrenheit range all week. The snow hasn’t quite melted and we are in the muddy limbo that happens every year.  This morning, we saw a number of Sandhill Cranes croaking overhead.  Their voices have a primal tone much like that of the Loon.  It stirs some kind of gut feeling that has no true explanation.

Last Sunday, we drove over to Holland to get the Winter’s snow off Reverie before it became an impossible mess of ice and condensation.  The last time we were there, it was 15° F and I was barely able to get under the heavy mass of snow piled atop Reverie’s tarp.   At the time, I knew we would have to get there at just the right time when things were softening up a bit but before temps were steadily above freezing.

 It took over an hour to get all the snow and ice off the tarp. The snow on deck was knee deep and weighed a considerable amount.  Massive blocks of ice had already formed along the toe rail pinning the tarp taut against the cabin and hatches.  This setup is  temporary and soon, we’ll have a better framework for the tarp so as to be able to work without having to untie the tarp every time; with a 20′ x 30′ tarp, that’s a lot of work.  I pulled the tarp back and we let the deck air out for the rest of the afternoon.  Had Reverie sat without a tarp for another Winter, I’m sure she would have been much worse off.  I know we got to her just in time; before she became nothing more than an assemblage of rotted wood.

The Galley, as we found it.  Looks pretty innocent,eh?

The galley, as we found it. Looks pretty innocent, eh?

The main problem with Reverie is her leaking deck, which started the insidious process that rotted her deck beams and other parts of her interior.  Her cabin-side seams are where a lot of the water entry was occurring; it was there that water leaked down into her galley space and wreaked havoc on the cabinetry.  Water was seeping into the sink/stove area which is the top of the galley space.  In December,  I removed the sink and found the opening completely soaked. In fact, the entire formica covered 3/4″ inch plywood top was completely saturated.

The drawers below had also gotten soaked making them impossible to open.  Luckily, there are two latched doors below them through which I was able to squeeze my arm in and force the damaged  drawers out.  We took them home with us with the intention of yet another off-site project.

Success!

Success!

Ouch

Ouch

The bottoms of the drawers were made of old school plywood, circa 1953, that didn’t take kindly to having water dripping on them.  The plywood was completely shot.  After taking the drawers apart, I decided to ditch the oak drawer sides in favor of 3/8″ marine plywood that will get sealed with epoxy.  The oak sides looked worse for the wear and were glued up from odd, narrow pieces that would have to be cleaned and  re-glued.  That’s more work than using fresh pieces of modern marine plywood.  The original wooden drawer faces are still serviceable but have splits that will get epoxied when they’re put back together.

Willy Nilly oak sides.  Probably a way of using scrap economically in the production of the boat.

Willy-nilly oak sides. Probably a way of using scrap economically in the production of the boat.

Crap!

Crap

So, I have the materials list all made up and construction method determined.  The entire galley cabinetry is going to have to come out to facilitate a frame repair so, I’m going to cut out the pieces and leave them that way until it all goes back together. If I assembled the drawers, they would be bulky and vulnerable to damage in storage.  For now, they’ll sit in a nice stack, ready to go back together in a moment’s notice.

So, the moral of this story, dear reader is: Never allow your deck leaks get to this point!  The whole mess with Reverie was caused by her leaking decks and would surely have been her undoing.

Stay dry, my friends!

~Roger


2 Comments

Wooden Blocks

March has arrived and the time change to Daylight Savings takes place in the early hours of Sunday morning.  Losing an hour of sleep shouldn’t be much of a problem seeing as I get up well before dawn anyway.  We have passed meteorologic Spring already and the  month brings with it the sense that I need to finish up with this Winter’s off-site projects.

The blocks on Reverie were in desperate need of TLC. The varnish on all of them was chipped and worn with the sheet blocks showing the worst of it.  They had been left on the boat for who knows how long, and had deep splits in the wooden cheeks with black water stains that looked permanent.


DSCN0304

Blocks, their sheaves, bronze roller bearings and cheek plates.


DSCN0046

Some of the blocks as we found them. The lorn sheet blocks are on right.

DSCN0305

Smart Strip does the job.

The first course of action was to disassemble everything and strip the cheeks down to bare wood so they could go into a hot bath of linseed oil, beeswax and turpentine.  I discovered SmartStrip when I was working on Persistence and needed to strip paint from fiberglass.  It is expensive, costing close to $60.00 a gallon but it is environmentally friendly and does the job.  It’s biodegradeable and has very little odor. We have had good results covering whatever needs to be stripped with plastic bags or plastic food wrap and leaving it on overnight.  It will be the stripper of choice for the rest of Reverie’s projects along with a heat gun for the hull and other easily accessible areas.


DSCN0578

A couple of block cheeks stripped and ready to go into the hot linseed oil mixture.

I applied the SmartStrip to  the wooden cheeks and let them sit overnight in plastic grocery bags. The next morning, I scraped off the varnish with a plastic putty knife and an old toothbrush.  I brushed household bleach on the black spots repeating this procedure until the spots were all but gone.  I then scrubbed them under running water so as to remove all traces of paint stripper and bleach.  Before they went into the oil mixture, I let them air dry for several days.

Getting the mixture of linseed oil, beeswax and turpentine at the right temperature takes careful monitoring of the hot plate.  I like to have it as hot as possible without smoking and potentially catching on fire.

DSCN0579

Well used hot plate and coffee can full of linseed oil, beeswax and turpentine.

I cooked each block for about 4 hours until I could see no more air bubbles coming out of the wood.  I then let them sit for a while on a piece of cardboard and really didn’t have to wipe any excess off except where they touched the cardboard.  I use boiled linseed oil, a bit of beeswax and  turpentine to help the mixture penetrate deep into the wood.  Boiled linseed oil dries faster than raw linseed oil but still, these cheeks are going to hang for a few months before I lightly sand them and finish them with spar varnish. The splits in the sheet block cheeks completely closed up after their soaking and one has to look hard to see them.  They’ll be fine.

So, that’s one more project off the list and a million more to go.  Regardless, it feels good to know it’s done and I don’t have to think about it any more.  That calls for a wee dram of Scotch!

Cheers,

Roger


Leave a comment

Mood Lighting and Hoarfrost

DSCN0560

Writing about boats seems a bit surreal on a morning such as this.   It’s six a.m. and the temperature outside reads -9° Fahrenheit.   A hot mug of coffee sits beside me as I look at the dog curled in a tight ball refusing to go outside until he absolutely has to.  Our African Grey parrot, who usually comes out and says good morning and loves to have her head scratched, huddles next to her heated perch silent as the morning at hand.  Julia gets up in a half hour.  All is quiet.

I know that February is the shortest month of the year but this year, it seems to be the longest.  Here in the Great Lakes region, we have had an exceptionally cold month with temperatures well below average.  It has been a rare moment when the thermometer has read above 20° during the day with nighttime temps below O°.  Today is the 27th and the month is, in fact, almost over.

March will certainly give us a break from the deep freeze that holds us so tightly in its grip.  In Michigan, March is that month of transition when Spring’s arrival beckons us with signs of warmer days ahead. Old Man Winter begrudgingly yields his reign over the land. We begin to notice the lengthening of the days while plodding through half frozen mud and melting snow banks.  We spot a bluebird perched on a fence post along a lonely country road; its ditch overflowing with melt water.  Sap drips from the trees as they awaken from their deep sleep.  Soon, there will be the chorus of spring peepers and blackbird songs to let us know the time has come.

The Great Lakes have frozen almost completely over, much as they did last year. This will mean a slower melt and the probability of cooler Summer water temperatures for the big lakes.  While this is not appealing to beach goers, it means less evaporation and higher water levels for the Great Lakes; great news for those of us who have been watching the steady decline in lake levels over the past decade or so.   When you are sailing a boat that draws over 4 feet of water, any increase is welcome.

The off-site  boat work has been going well but last weekend, I had to get to the boat to take a few measurements and do some more prep work for the next phase that involves removing and replacing the deck beams.  “Remove and replace the deck beams”  It sounds pretty straightforward.  Easier said than done.  One short sentence sums up a whole lot of work.  So, it was off to the boat on a blustery 15° day to see what needs to be done.

Reverie sat there under a massive mound of snow that strained her tarp taut against her deck.  Fortunately, she sits alongside an industrial building protected from the significant Westerly winds blowing off Lake Michigan.  I had to shovel my way to get alongside and clambered aboard.  I tried to coax the snow from the tarp then had to lift 10 pound chunks of ice that had settled on the deck just to make room to squeeze into the cockpit.  Julia handed me tools and other work related items.  I quickly had the cockpit filled with milk crates and 5 gallon buckets full of work stuff.  I then had to navigate my way around everything to get into cabin.   Julia had some business to attend to nearby so I went to work for a few hours alone.

The building next door where I plug in had just been rented to a new tenant and I didn’t have access to electricity (lights, heater…) so I brought along a supply of candles and a Dietz lantern for light and a wee bit of welcome heat.   I climbed into the the cabin and it was pitch black due to the amount of snow on the tarp. I got a few candles lit and looked about me to discover the interior of the boat looked more like an ice cave than a cozy work space.  There was hoarfrost covering the entire interior.  It was so dark, the candles did little to illuminate the cabin enough to work so I had to leave the companionway open for whatever light came from outside. This deprived me of any heat they might have given off.

Light at the end of the tunnel

Light at the end of the tunnel

With a little LED lamp in one hand and candles all around, I set to work.  This stage of the project involves a lot of assessment and planning so, I had no illusions about getting a lot of physical work done.  What I wanted to do on this cold day was to get the port-side bunk removed so as to be able to inspect the hull and deck beam ends.

The deck beams are notched into a hefty sheer clamp which is a board running the entire length of the boat that provides stiffness to the hull and support for the deck.  I wanted to see how the deck beams were fastened so as to plan for their extraction later.  I removed the most rotted beam and found that it was nailed to the sheer clamp from above and fastened to the frame.

Frames are the ‘ribs’ you see inside of a wooden boat that resemble the ribs of a fish.  The deck beams we have to replace first are the ones that were tied into the carline or header I made last week.  They are called half beams.  Those ends that are inboard were easy to inspect with the carline removed.   The mystery of what was outboard hidden by the sheer clamp was what I came to ascertain and therein lay most of the work.

One of the great things about a wooden boat is that everything is held together with fasteners; screws, nails and trenails (essentially wooden dowels or pins).  If it can be put together, it can be taken apart.  To get at the outboard beam ends is going to require the removal of the toe rail, covering board and sheer plank. The toe rail is on the deck and does the job of keeping one’s toes from slipping overboard.  The covering board is the piece that provides a big, solid edge trim for the entire deck.  The sheer strake is the final plank of the topside of the hull.  All of these pieces are held together with screws that are hidden under bungs, which are wooden plugs glued and sealed to make the piece uniform and water tight.

Gaining access to the beams is more work than replacing the beams themselves.  If there were just a few small half beams to replace, the sheer strake might not have to be removed but one of the king beams or ‘heavy beams’ (major structural components) has to be replaced and I see no way to do it without removing the sheer strake.  In the long run, the whole job will be easier with the sheer strake removed.  This will give us a good look at the frame ends and allow the rest of the ‘good’ beam ends to be sealed and treated.

I  got the port-side bunk removed and had a look at the interior of the hull.  The whole interior of the hull is painted and the paint is peeling badly.  That’s going to require the removal of all of the interior joiner work, a lot of scraping and stripping with a heat gun once we have electricity.  That’s not such a bad thing as it will allow the inspection of every inch of the hull.  I found another cracked frame hidden below the bunk in a place I couldn’t see when I made my initial survey of the boat in December.  I expect to find more of this as there are a lot of areas I was unable to see without removing everything.

The bunk came out in an hour or so and I sat there with a jar full of screws to be labelled ‘port bunk’.  In the darkness, still clutching the LED lamp in my left hand, I scraped what paint I could. Some of it came off in rather sizable chunks.  I refrained from really going at it and creating dust since I wasn’t wearing a dust mask and not fond of inhaling lead. After that, I then cleaned up and sorted tools and supplies in as orderly a fashion as possible.

In just three hours, several hundred more hours of labor reared it’s head like a serpent from the deep.  My initial estimate was optimistic but I’m a realist and won’t overlook anything that would compromise the integrity of the boat as a whole. “Did I do this?” or, “Did I do that?”, are not questions you want to ask yourself on the open water in heavy weather.

Port-side bunk removed and some scraping done.

Port-side bunk removed.

Even in 15° with my feet and hands numb from the cold,  I had to pull myself away and close up Reverie until another work day.  Maybe the next time we return,  we’ll even hear a blackbird or two.

Stay warm, my friends.

Roger


2 Comments

Port-side Carline

DSCN0259

Old Man Winter is really giving it to us this week with daytime temps in the single digits and nighttime temps below zero. On our back road morning commute, the other day, the thermometer read -20 F.  We have now been monitoring that area of our commute and have been finding there’s this little stretch of micro climate where the temperature is usually a few degrees cooler than elsewhere.  Hmm…

I’m committed to splitting up a giant red oak for firewood tomorrow but we’ll have to see if the machine will start in this kind of weather.   The forecast calls for -17 F night tonight so, dreaming of boats is a good way to pass the time.  As cold and snowy as it is outside, I still have some off-site projects to accomplish.

One of the off-site projects I am pleased to have gotten done is cutting out the port-side cabin carline to replace the damaged rotting one.


Port-side carline removed with rotting deck beams

On wooden boats, carlines are fore and aft deck supports that frame openings, such as hatches and the coach roof of the cabin, that run parallel to the keel.  This carline had already been removed when we got the boat. Luckily, it was intact so I had a nice template for the new one to replace it.  White Oak is the wood used for the deck beams and carlines of Reverie.    A band saw would have been very handy to cut out this piece as the carline is about 5-1/2 feet long.  That means 11 feet of sawing through 1-1/2 inch white oak.   Not having a band saw at my immediate disposal didn’t deter me from getting this done.


Pilot holes for the cut.

Pilot holes for the cut.


I first tried using a saber saw thinking it would be a good tool to keep the blade perpendicular to the mark and, ultimately, less work shaping the carline to its final dimensions. I made it less than a foot before the saber saw blade yielded to the mighty white oak and snapped.  Had I been successful with that laborious method, it would have taken me forever to cut that eleven feet.

It was time for bigger guns and a bit more concentration.  I chose to go at it again with a Sawzall and the largest blade aptly named ‘The Ax’ .  This is a big blade made for demolition work and capable of cutting through not only wood but stray nails and the like; perfect for hard white oak.  That said, I started with a fresh blade and noticed it wasn’t cutting as well by the time I finished.


Sawzall with 'Axe' blade

Sawzall with ‘Ax’ blade

Concentration was key at this phase.  I wanted to keep the cut 1/8″ from the template lines so as not to spend an inordinate amount of time shaping the piece later.  It wasn’t fast but the cut went well and I was glad to have gotten that close when I finished shaping the outer curve of the carline with a draw knife and hand planes.


DSCN0488

Stanley Rabbet Plane set to bullnose position.

DSCN0489

Draw knife used bevel side up for convex cuts and bevel side down for concave cuts.

The draw knife was used to bring the piece evenly close to the final mark.  The rabbet plane set in the bull nose position worked admirably for the concave planing as did the wooden jack plane for the convex planing.  As I worked, I checked for square often. It varied by no more than a 32nd” off square. I marked those areas with a pencil so as not to plane the rest of the edge out of square.

Keeping the Sawzall visually perpendicular to the piece takes a bit of practice and I would recommend cutting 1/4″ or slightly more away from the template mark if you’re not confident in your sighting ability.  It might take a bit more time in the final shaping but it’s better than ruining a big, expensive chunk of oak.

DSCN0487

16″ Wooden Jack Plane

The wooden jack plane is one of my favorite tools.  I stuck the removable handle back on it for the photo but I use it without.  I find I have a lot more control with both hands cupping the body.   It has somehow survived these 100 plus years and gives me great joy when I use it.  It looks crude and simple compared to more modern steel body planes but its razor sharp, heavy blade doesn’t chatter and provides lovely curls of fragrant wood as it glides its way through a project.  It literally sings with sonorous notes that tell you it is perfectly adjusted.  I made our Arts and Crafts inspired oak and walnut bed relying heavily on this plane and I can still hear the notes as I planed away. It planes so smoothly, I’ve never bothered to sand or take a cabinet scraper to the bed. The old jack plane comes alive and the resonance in the wood is sheer delight to experience. It did sing a couple of times when I was working on the carline but it was quick work and I never really got it going.   It is a privilege to own and I hope it provides some other lucky woodworker(s) the joy is has for me when I am dead and gone.

Out with the old, in with the new.

Out with the old, in with the new.


Once the piece was square and within 1/16 ” to the template mark, I stopped and will do the last few passes when I’m back at the boat. When you shape a piece of wood like this, you are releasing it from its former state and it now has a definite purpose.  The carline was always there, latent in that slab of oak.  I feel that I did nothing more than free it to a higher purpose.  After all, it could very well have been cut into 16″ sections and split up into firewood to warm some chilly soul on this frigid Winter day.

Stay warm, my friends.

~Roger


Leave a comment

Falling Snow and Polished Brass

FALLING SNOW

The Winter of 2014/15 has been a strange one for us here in Southeast Lower Michigan.  The month of November delivered bitter cold and record lake effect snow events along the windward shores of the Great Lakes.  Lake Effect snow occurs when extremely cold air moves across the unfrozen Great Lakes. The moisture from the relatively warm lake is drawn into the frigid air creating snow that falls in bands when it hits the next land mass.  The prevailing winds for this to occur are generally from the N, NNW and W.

December and January vacillated between exceptionally warmer temps and exceptionally frigid spells of Alberta Clippers and Polar Vortexes. There was little snow which made for lousy cross country skiing in our neck of the woods.  After last years record snowfall, this Winter has been anticlimactic.  The previous Winter was a once in a lifetime experience that allowed us to ski daily in near perfect conditions right in our own backyard.

Then, February arrived and let us know it was not messing around.  12 to 17 inches of snow fell across the entire lower portion of Michigan with most of the Midwest seeing significant amounts in that 24 hr period. It started in the wee hours of February 1 and ended the morning of the 2nd. The pendulum swung and we were in the grips of powerful Arctic air.  Single digit Fahrenheit temperatures are not conducive to boat work but this is a huge project and progress must be made.


DSCN0255

Post February 1-2nd snowstorm. It took us several hours to clear our driveway and pathways.


It was during one of those warmer spells (slightly above freezing) in early December when we went to take a look at this wooden sailboat, Reverie, stoically losing it’s battle with time.  We are taking a Panglossian view of this Winter as it seems better for laying the foundations for the restoration of Reverie than it is for cross country skiing. Our ‘best of all possible worlds’ has provided corridors of time and windows of opportunity allowing us to get things done.  To date, we have over 90 hours of labor invested in Reverie.  That doesn’t count travel time to and from the boat. We’ve made the best use of this down time and have accomplished what we could.  The boat is in Holland, Michigan, a 2-1/2 hr drive from our home in Southeastern Michigan so any off site work that can be done is crucial to a timely restoration.

POLISHING BRASS

On one of our visits to the boat, we removed the brass lamps, the ship’s bell and the original Airguide barometer and clock. Everything was badly in need of some elbow grease.  I ripped up an old bed sheet into 1 foot squares and got cracking.

Perko Lamp

Perko Lamp: The Perko needs a new burner as the tabs have broken off, so I’m keeping my ear to the eBay door & scanning thrift shops for a replacements. It needs a P&A Hornet burner.

.


Nice old lamp that reads, "English Made 3/4" wick" on the burner.

Nice old lamp that reads, “English Made 3/4″ wick” on the burner.

Airguide Barometer

Airguide Barometer

Airguide Clock with German movement.

Airguide Clock before cleaning

The Airguide clock is pretty neat.  It cleaned up really well.  It has a German movement that operates on a C battery and  allows exact time adjustment.  I’ve got it set to within a few seconds error a day and am slowly tweaking it to exact time.

DSCN0257

Everything polished up quite nicely and after 50 plus hours of polishing, we have this. Julia picked up a bottle of Wright’s Brass Polish and I was excited to give it a try.  Over the years, I’ve tried many brands of polish and wasn’t terribly impressed by some of the brands that claim to be “the best”.  Wright’s works the best, hands down. It doesn’t require a lot of pressure to work.  With other polishes, I would have to stop after a few hours because my fingers were getting sore from applying pressure.  With Wright’s it is a good idea to let the polish sit on the metal for a short time before beginning to polish to allow the chemical reaction to start.  Speaking of chemical reactions, it was easy on my hands and washed off very easily with water.


I was very happy to get this tedious chore out of the way during the Winter.  It’s one of those things I “don’t have time for” during the warmer months when one’s time is better spent outdoors.   The only other time I might feel like doing this is while cruising . You’re on the boat anyway and there’s only so much napping and reading to do in the off-watch time. Hours and hours of polishing is not a bad way to go.

These lamps had a coating of grunge on them as well so they were especially nasty to clean.  I find that polishing brass is rather cathartic and the results are amazing.  Once polished, these old relics became wonderful works of art that would be hard to distinguish from new if it weren’t for the various dents that come with years of use.  The real trick with brass is to maintain it.  You have to keep up on it and not let any deep dark spots develop.     I don’t expect the next round of polishing to take nearly as long.

 “A rub in time saves nine”?

Cheers,

Roger


Leave a comment

“Thought is the labor of the intellect, reverie is its pleasure.” ~Victor Hugo