Restoring Reverie

: The Art of Restoring & Sailing a Classic Wooden Sailboat


Leave a comment

Getting A Handle On Things

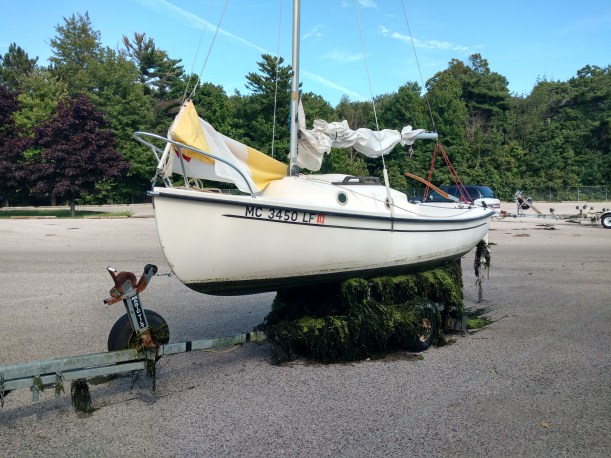
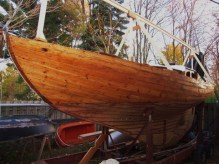
This spring, icy rain and violent winds kept me inside for many a day, here along the shore of Lake Michigan; rain, cold, sporadic clearing, repeat.    What’s important is the sporadic clearing.  There were some decent days, here and there. In those fleeting times, I jumped at the opportunity to get out for a good day of work on Reverie.  After a winter of ferocious gales it became a “beggars can’t be choosers” situation. I found myself going out in weather that was less than ideal but, conversely, less than tempestuous.

It’s like being out on an extended cruise; you realize you’ll never get anywhere if you wait for ideal conditions and, sooner or later, find yourself sailing in weather you never would have imagined. This cool, wet weather was great for tulips, though, and we’ve been enjoying a wonderful display of colors provided by the city of Holland making the Tulip Time Festival a spectacular one.

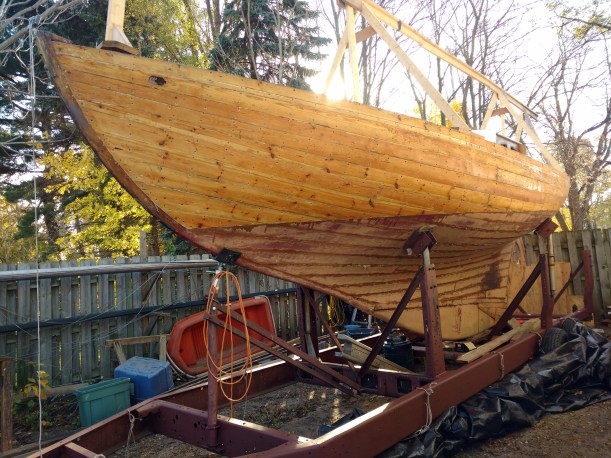
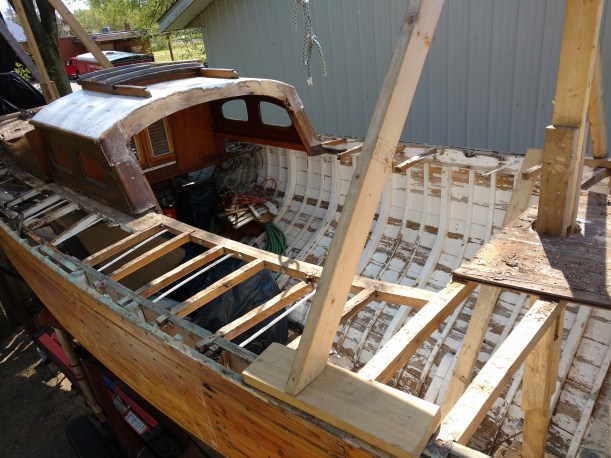
The time I managed to get some boat work in was quality time.  I was a relentless force of deconstruction.  The multi tool and sawzall got put through their paces and the deck is now completely removed with half the cabin top removed, as well. The hands on work aboard Reverie has taken a leap forward but new challenges revealed themselves during the dismantling. That, dear reader, is for the next blog entry.  This entry is about getting a handle on things and that we did.

IMG_20170515_154638578

One of this past winter/spring projects was to get all the tools tuned up and ready for use. Over the years, more than  a few tools have arrived at “Roger’s Home For Wayward Tools” that were missing their handles or lacking in some other respect. They needed a little help to get them in working order.

There was that 1-1/2 lb. ball-peen hammer we would need for riveting the frames.  There was that handsome Dayton pattern ax that had had its head secured with several large, hex head machine screws hammered over like clench nails; its handle also needed stripping and sanding (with the added benefit of erasing the name of the former owner proudly scrawled in bold, black marker).  There was also a hewing ax that was missing its handle but would soon be put to service.  It was time to get a handle on things.

IMG_20170318_101322238

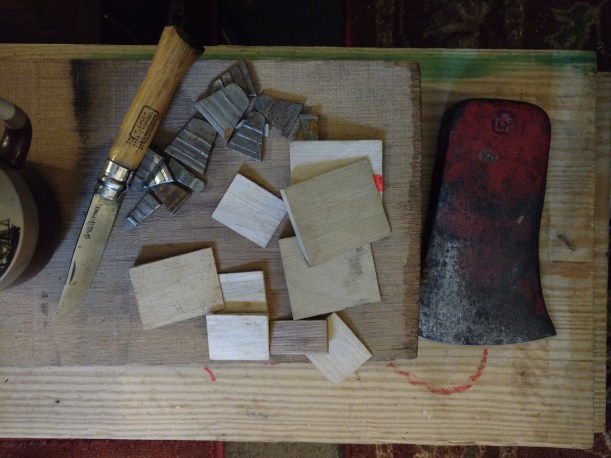
Picking out the right wedge for the Council Tools Dayton pattern ax that needed its handle reset.

IMG_20170425_094457493

A fine old hewing ax head getting a soak in vinegar and salt to remove the century of rust that hid its true personality.

IMG_20170427_080506247

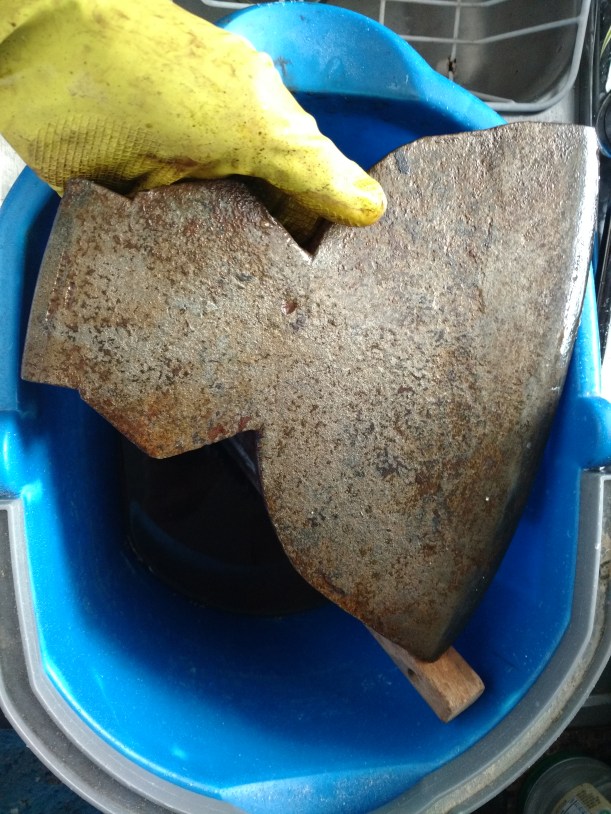
A finishing soak in baking soda and water to neutralize the acid and salt bath.  The blade still had a very sharp edge for being knocked about so many years.  Hand hammered forge marks and the folded cutting edge are apparent. “And what, pray tell, do you need a hewing ax for?”, you ask.  More on why we need a hewing ax in the next post.  Stay tuned.


Almost all of my chisels were in need of having their handles reset and some quality time on the Japanese waterstones.  Many of the blades needed to be hollow ground and lapped.  Hollow grinding is where you take the beveled side of the blade and run it over a grindstone to remove the middle of the bevel. This means less of the blade touches the honing surface.  Lapping is the process of making the flat side of the chisel completely flat.  This may not seem important but, avoid this process at your own peril; it’s an absolute necessity.

Most notable among the arsenal of chisels was the 2 inch wide timber slick.  A slick is a large chisel used where a substantial amount of wood needs to be worked such as in timber framing or working on the backbone of a wooden boat. For years, I used it occasionally but now am finding it necessary to use for some serious work ahead.  It had a broken old handle that I had reshaped and used awkwardly so I never really got to use it to its true potential.  Getting a handle on this beast is going to make less work in the long run and justify all the work I put into shaping a new handle.

IMG_20170320_153654919

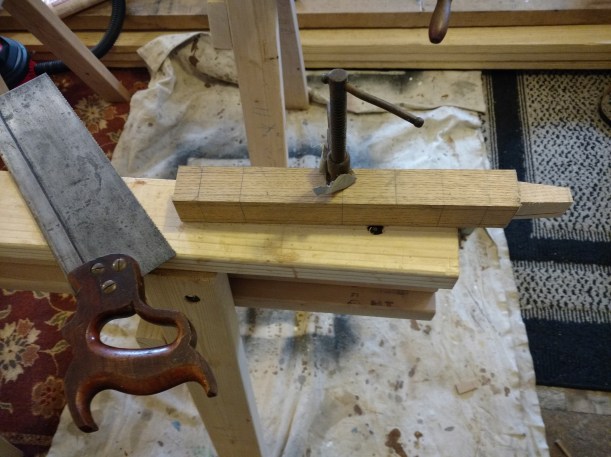
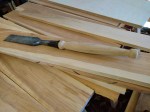
Here’s the white oak blank for the chisel handle with the tang fitting cut out using a fine-tooth Disston backsaw. The backsaw was sold by the T.B. Rayl Co. which sold tools in downtown Detroit.

IMG_20170321_095236192

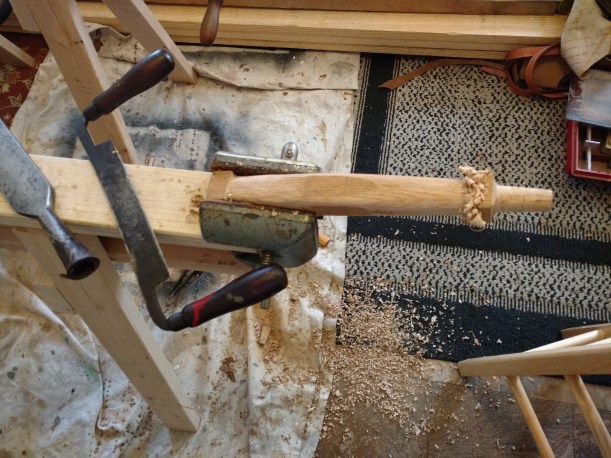
The handle taking shape thanks to the razor sharp draw knife made by the Ohio Tool Co.  It’s one of my favorite tools.  I’ve left the splatter of red paint on the handle to remind me of the trip to the emergency room that would be required if it were grabbed by the blade.  .

IMG_20170322_102503664 (2)

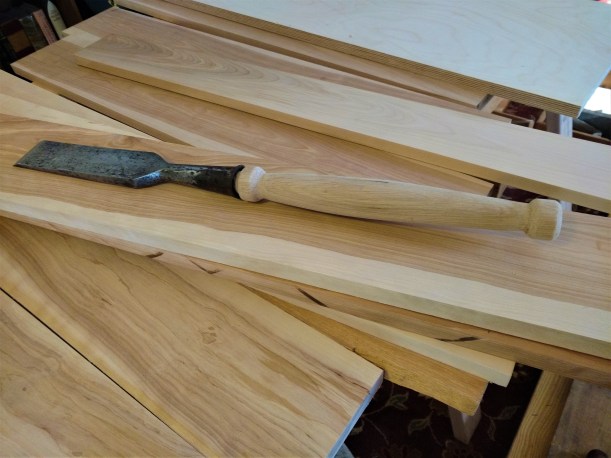
The handle getting its first fitting on the slick.  Pencil lines on the handle are preserved to keep things uniform right until it’s finished. Being able to use this tool two-handed is imperative.  The worldly slick, with its handle, is 23-1/2 inches long.

It feels good to get some of these old tools back in working order and on to a life of continued use.  Quite often, preparation is the most time consuming aspect of any job.  Having all your ducks in a row may seem tedious and even unnecessary when they seem to hardly relate to the task at hand but prepare, we must.

Having usable axes and hammers with sturdy handles along with sharp chisels that cut fine, paper thin slices of wood is truly worth the effort because they save time and are safer to use than tools that are just “good enough”.  Sometimes, only the best will do.  I’m happy to have this out of the way and on to more boat work.  There’s no need to shake one’s fist at the weather when it’s not agreeable.  There’s always something to do.


2 Comments

What’s Done Is Done

“To come to the end of a time of anxiety and fear!  To feel the cloud that hung over us lift and disperse- the cloud that dulled the heart and made happiness no more than a memory!  This at least is one joy that must have been known by almost every living creature.”

-Richard Adams, Watership Down


Last night, a task was put to rest that has plagued the restoration project for some time.  Last night, as twilight fell, I wrestled the 20 x 30 ft tarp over it’s frame and  drove away knowing I was done stripping, sanding and oiling the entire topsides of the good ship, Reverie.  A November Gale was kicking into high gear on the entire Upper Great Lakes with our Lake Michigan seeing 50 mph gusts before midnight.  It had begun to spit and gust earlier in the day but I had to finish leveling and blocking the trailer before another Winter set in.  With Reverie buttoned up for the storm, level and covered, I felt like I finally had some good news to share.

The stripping, sanding and oiling of the topsides is now complete.  I started the port-side last year and finished about this time last November, thinking I would be able to get the starboard-side done in the Spring and move along.  I jumped into it last April with renewed enthusiasm and resolve to finish this most unpleasant task.  What was it about this task, this minor detail (on paper), that made me want to do anything and everything but what needed to be done?

There was, first and foremost, the mess.  Everything about the job involved a mess.  Large piles of scraped paint and toxic sawdust required constant vigilance and tidiness. In April I got about six feet working on the starboard side from the bow back.  Last Summer, we were in the grips of one of the most humid summers I can remember.  Wearing coveralls, gloves, hat, goggles and respirator was like some form of Medieval  torture .  Eventually, I  succumbed to heat exhaustion and decided to put the project on hold.

While the planning went on, the actual work on Reverie came to a quiet halt, for the summer.  Instead, we got out on the water and had some sailing days aboard our little Com-Pac 16, Prudence; 85° F with 85-90% humidity is bearable when you are 10 miles offshore.  We sailed and sailed until the weeds clogged our boat launch to the point of us almost getting stuck in invasive Eurasian Watermilfoil.  Keels and milfoil don’t mix.

Click to access Eurasian_Watermilfoil_521353_7.pdf

img_20160818_154420832

Just one of the brilliant days on Lake Michigan

img_20160826_163420703_hdr

Invasive plants at Port Sheldon

By the time the weed situation shut down our sailing, we made time to get a thing or two done aboard Reverie.  Julia started removing the rest of the interior cabinetry while I did various odd jobs that needed to be done sooner than later.  She eventually removed enough of the galley to expose the engine which made it easier to get it ready for removal.

I ended up getting the last of the interior out with a hammer and pry bar, preserving only what would go back on board.  A lot of the wood had experienced some effect of leaking rainwater and had to be taken out of the equation.  We put everything into storage to be used as templates, if needed. The interior is so much easier to assess with all of the cabinetry removed.

img_20161021_161047130_hdr

Reverie. happy to have all the rotting wood removed

By the time all this work was done, the weather had cooled down enough for me to buck up and get back to the scraping.  On a relatively large project, such as this,  it is a good idea to stick to tasks as distractions lurk at every turn.  Look, a bird!  Checking something off the list allows the mind to be released from further thought on the subject and proceed toward the end.  There’s a lot of that to come.

The starboard topsides proved to be a bit more of a challenge than the port-sides.  It seems a good deal of Reverie’s life was spent taking the hard knocks on the starboard side.  There, I found replaced planks (More on that later…  Much more).  There were areas that had been faired with what appeared to be an epoxy-based filler.  Oh yes, someone used 5200 for caulking the plank seams. I have seen 5200 recommended, in various online forums where free advice is handed out like champagne on New Years Eve; copiously and carelessly.  Dear reader, if you are ever thinking of restoring or maintaining a wooden boat and you choose to use 5200 to caulk seams, let me tell you, Old Nick has a special task in hell for you: eternity cleaning 5200 from plank seams.  Don’t say I didn’t warn you. 5200 will be used in this project to great effect, later on down the road but not here.

I had to modify my heat gun/scraping technique and managed to get the brunt of it done by sharpening a flat scraper and using it much like a cabinet scraper.  This produced a better surface than the method I used on the port, side reducing sanding time significantly.  It took 60 hours to scrape, sand and oil the port topside compared to about 80 hours for the starboard.

IMG_20161118_095558194.jpg

Starboard Topsides scraped, sanded and oiled

IMG_20161118_095447711.jpg

Port Topsides scraped, sanded and oiled. Trailer looks spiffy with some fresh primer.

The past few days were near record highs for November with temps around 70° F.  Both sides got two coats of piping hot tung oil and turpentine.  The boat smells wonderful! Reverie looks so different without the layers of cracked, peeling paint and exposed wood.

As the air pressure began to fall and the breeze became a gale, I put a quart of primer on the trailer.  It to looks happier.  I took a 12 ton bottle jack and it all rests  on cement blocks instead of the trailer tires. After I got the trailer leveled, I got the boat leveled a bit more.   It really helped to stabilize the whole thing and get the tires off the ground.  I gave the lug nuts a good soak of penetrant and plan put the tires out of the elements for the duration of the project.  With the wheels off, the brakes will be begging for an overhaul… .

Scraping, sanding and oiling below the waterline will go much better as there won’t be scaffolding involved and the paint seems to come off easier.  We’ll see.  For now, we can move forward and I no longer have that messy job to mess up my day. Today, my aches were a little less achy.  My step, a little more peppy. There’s a little vim in my vigor.   I even had to raise the rear view mirror in the car from so much slouching.  Yes, the world was a kinder place, now that that is done.  Onward!


Leave a comment

Winter Projects

It was only a matter of time before Old Man Winter arrived in earnest.  After reveling over our Christmas Day sail on Lake Michigan, we knew we would be seeing a bit of cold, wind and snow regardless of autumn’s refusal to part ways.  The Great Lakes saw almost no ice cover this year so when the arctic air arrived, the frigid wind blowing over the relatively warm water made for some respectable lake effect snow showers.  Last week, we got close to 20 inches of snow and temps that stayed low enough to get out for a bit of cross country skiing.  These lake effect snow showers come in bands and look very much like ripples in the sand when you see them in the sky or view them on radar. They leave sizable amounts of snow in their wake while other areas nearby experience little or no snow.

The Sun going down under Lake Michigan snow bands.

The Sun going down under Lake Michigan snow bands.

DSCN1742

Overlooking Lake Michigan from Oval Beach in Saugatuck, Michigan. If you look closely, there are two people just beyond the dune grass on the right, to give you perspective.


DSCN1725

Julia on her vintage pair of wooden skis. Check out that amazing Norwegian sweater.

DSCN1505

Wood is good!

Yesterday, the wind was coming from the South, clocking to Southwest, blowing gales to 45 knots with gusts to 60 knots on Lake Michigan.  Reverie is tucked behind a building sheltering her from the brunt of the gale but still, I wondered about the  tarp holding out in these conditions.  I wondered about the towering oak tree with the 10 foot girth leaning over the tiny cottage we were in last year.  Did it make it through the gale?  Are the people that now live there  o.k.?

“Great emergencies certainly inspire us with the feelings they demand; and many a man has braved a storm on the wide wild oceans, who would have shrunk from its voice as it pealed down the chimney”

-Charles Maturin. Chapter XI,  Melmoth the Wanderer 1820


What a difference a day makes; especially when you’re talking about Great Lakes weather.  Today, it’s sunny, 50°F and the wind has settled down to 17 mph,  blowing from the West.  The snow has melted except for the big piles left by the plows.  It feels very springlike. I may not be convinced that spring has arrived but I’m sure it’s on it’s way and those little projects I had set aside on the winter “to do” list  need to be addressed before I see the first bluebird of the season.

The “to do”  list wasn’t terribly long this year.  I made sure to leave plenty of time for Julia, reading and painting.   It’s been good.  Along with the usual, copious amounts of nonfiction, I have also been revisiting Moby Dick for the fifth time in my life. The first two times were in my youth when I was grounded at our summer cottage (I got grounded a lot).  We had this massive, worn copy of Moby Dick that had the front cover torn loose.  It’s long gone now, as is the cottage, but I still remember the illustration of Queequeg entering the darkened room of the Spouter Inn with a lamp and shrunken head!   I would lie there on one of the antique pull-out beds that lined the front room and read away while everyone else swam and played within earshot.  It may be that, “damp drizzly November in my soul”, that earned me so much down time but it was in those pages I found a take on the human condition I could agree with.  I’ve read Don Quixote as many times and am going to give it another read when I’m done with Melville.  Maybe I’ll  follow that up with The Count of Monte Cristo. It’s like meeting up with old friends you haven’t seen in a while and catching up.  Good stuff.

Since the beginning of the new year, I’ve completed 7 paintings and have sketches prepared for 7 more.  On the nuts and bolts side, I’ve also been cutting mat and making custom frames out of flame maple.    I need to have 20 ready for a show and still have a few more to make.  It’s good to have the skills to be able to do my own framing as it’s rather expensive even when you do it yourself.


In From The Fog

In From The Fog

Lake Effect Snow on 112th Avenue

Lake Effect Snow on 112th Avenue

Snow Bands Over New Holland

Snow Bands Over New Holland

Round Barn and Teasel

Round Barn and Teasel

Iceboats on Lake Macatawa

Iceboats on Lake Macatawa

Ice, Wind and Speed

Ice, Wind and Speed


Fallasburg Covered Bridge

Fallasburg Covered Bridge

The projects I had to finish for the season are coming along nicely, as well.  The biggest time consumer was disassembling and cleaning our binoculars.  We have one pair of cheap West Marine binoculars I got as a backup for a pair of WWII M-16 binoculars that I eventually sold as they deserved to be in the hands of a collector who would appreciate them rather than living on the sailboat and getting beaten up.  I did find a decent pair of 50-60 year old 7 x 50 post-war Japanese binoculars at an estate sale that I thought would serve well as the primary boat binocs.  The optics were good and they seemed to be of a quality rivaling the M-16s.  I checked on the internet and found there was a Japanese trade guild that had very stringent quality control standards and this happened to be one of that make.  They are marked with symbols and numbers that allow you to find exactly who made them. This list is on the internet should you wish to try your hand at refurbishing a pair of vintage binoculars on the cheap.

Julia and I were at a thrift store a few weeks ago and found another pair of Japanese 7 x 35 binocs. They were really beaten up and dirty but I recognized the guild mark and we picked them up for 4 bucks.  These were to be my test pair in order to acquaint myself with the cleaning procedure and not ruin the pair that were to go on the boat.   I found this site that is maintained by an astronomy enthusiast which gave a nudge in the right direction:

http://www.orion-xt10.com/how-to-restore-old-binoculars.html

Although the binoculars I worked on were not exactly like the ones he describes, I was able to glean enough to proceed with caution.  I do emphasize proceeding with caution.  These old binoculars will come apart but they are like multi-level puzzles that one can easily damage if  patience and care are not exercised. The first pair took quite some time, primarily because they were so filthy.  There were a few steps where I stopped, put them down and revisited them after I had time to consider that my previous thoughts about their assembly were incorrect.  I took them apart just enough to clean the lenses and diopters with repeated careful applications of distilled water and isopropyl alcohol (1 pint 97% alcohol to 1 gallon distilled water) daubed on with a Q-tip and lifted with a clean, soft, lint-free rag.  No pressure or rubbing until they looked clean enough to use a lens cloth on.  The tiniest amount of dust will permanently scratch the lenses.

The 7 x 35's taken apart.

The 7 x 35’s taken apart.

The 7 x 35's back in action. We'll use these for bird watching.

The 7 x 35’s back in action. We’ll use these for bird watching.

As I said, the binoculars were filthy but I got them in quite serviceable condition.  I’ve always wanted to have this skill after reading Lothar-Günther Buchheim’s descripition of it in Das Boot.  I like the idea that something can be taken apart and put back together.  In this day and age, we have been conditioned by the tenet of consumer culture that tells us to discard something that is no longer new.  Something has been lost, in this modern system.  By giving us an endless supply of consumer goods, it has deprived us of a sense of accomplishment and self-worth that comes from maintaining what we already have.  That “never needs maintenance” philosophy is just another way of saying “you’ll be throwing it out sooner than later”.

With this new found skill, I feel confident getting the 7 x 50’s apart and was even able to get the rattling lens in the West Marine pair take care of.  In doing so, I was not surprised to find many of the parts were no longer machined metal but molded plastic.  I feel fortunate to be living out my life while many of the older products are still available to use and not in museums.

Binocular Overhaul Part II: A pair of 7 x 50's This pair got a major overhaul that included removing & cleaning the prisms. I didn't take pics of the prisms because I didn't want to set them down. Delicate work.

Binocular Overhaul Part II: A pair of 7 x 50’s This pair got a major overhaul that included removing & cleaning the prisms. I didn’t take pics of the prisms because I didn’t want to set them down. Delicate work.

To cap off this Winter’s service projects, I still have to replace the water pump impeller on Prudence’s outboard motor.  I bought the impeller last Fall and somehow managed to dodge that task knowing I had already greased up the old one.  It looked fine but once I got the new one, I realized how much the old one needed replacing.  It’s on the list.